TR
TR EN
EN

How to Remove a Stuck Oil Filter: Methods, Tips, and Safety Precautions
Changing the engine oil is one of the most basic maintenance procedures on a car. In theory, removing the old oil filter should be just as simple as draining the oil and installing a new filter.
In practice, however, an oil filter can become extremely difficult to remove.
A filter that was overtightened during the previous oil change, installed with a dry gasket, left in place for too long, or exposed to heat and corrosion can become stuck to the engine.
When this happens, repeatedly trying to turn it by hand usually does not solve the problem. Applying too much force with the wrong tool can also damage the filter housing, oil filter cap, or surrounding components.
So, how do you remove a stuck oil filter?
The answer depends on the type of filter, how tightly it is stuck, how much access you have, and whether the filter is a traditional spin-on type or a cartridge-style system.
Why Does an Oil Filter Get Stuck?
Before trying to remove a stuck filter, it helps to understand why it became difficult to remove in the first place.
The filter was overtightened
This is one of the most common reasons.
Many spin-on oil filters are designed to be tightened by hand according to the manufacturer's instructions. They generally do not need to be installed with extreme force.
If someone uses a wrench to tighten the filter excessively, the rubber gasket can become compressed against the mounting surface.
After thousands of kilometers and repeated exposure to engine heat, the gasket can effectively bond to the engine.
The result is an oil filter that may require significantly more force to remove than expected.
The gasket was installed incorrectly
The rubber gasket on a spin-on filter should normally be lightly lubricated with clean engine oil before installation.
If the gasket is installed completely dry, it can stick to the mounting surface.
An old gasket left behind from a previous filter can create an even more serious problem.
This is sometimes called a double gasket situation. If the old gasket remains attached to the engine and a new filter is installed on top of it, the filter may not seal correctly and can leak oil.
The filter has been installed for too long
An oil filter may remain attached to the engine for many months or thousands of kilometers.
During this time, repeated heating and cooling cycles can cause the gasket to adhere tightly to the mounting surface.
Heat and contamination
Oil, dirt, road salt, moisture, and engine heat can contribute to the filter becoming difficult to remove.
Filters located in areas exposed to road debris or moisture may be particularly difficult to remove if the exterior becomes corroded.
First: Make Sure You Have the Correct Filter Type
Before using excessive force, identify the type of oil filter installed on the engine.
There are two common designs.
Spin-on oil filter
This is a complete metal filter that screws directly onto the engine.
It normally has a cylindrical metal body and a rubber sealing gasket around its mounting surface.
For this type, the entire filter rotates when it is removed.
Cartridge oil filter
A cartridge filter uses a replaceable filter element inside a reusable housing.
Instead of removing the entire filter, you normally remove a plastic or metal filter housing cap.
The cap may have a specific hexagonal fitting designed for a socket.
These two systems require completely different removal methods.
Never use a punch, screwdriver, or other destructive technique on a cartridge housing unless you are absolutely certain that the part is designed to tolerate it.
Let the Engine Cool to a Safe Temperature
If you have just driven the vehicle, be careful before working around the oil filter.
Engine oil can become extremely hot.
A warm engine can sometimes make the oil filter gasket slightly easier to loosen, but safety is more important than trying to gain a small mechanical advantage from heat.
Allow the engine and surrounding components to cool to a safe working temperature.
Do not work underneath a vehicle supported only by a jack.
Use appropriate jack stands or a suitable vehicle lift on a stable surface.
Try Removing the Filter by Hand First
If you have a spin-on filter, try turning it counterclockwise by hand.
Remember:
Counterclockwise loosens the filter.
Before applying extreme force, make sure your hands are clean and dry enough to obtain a good grip.
An oil filter can be difficult to turn simply because its surface is oily.
A rubberized work glove can sometimes provide enough additional grip to remove a filter that is only moderately tight.
Do not keep squeezing harder indefinitely. If the filter does not move, move to a proper filter removal tool.
Use an Oil Filter Wrench
An oil filter wrench is usually the best next step.
Several types are available.
Strap-style filter wrench
A strap wrench wraps around the filter and tightens as you turn it.
It can work well when there is enough space around the filter.
Chain-style filter wrench
A chain wrench uses a chain wrapped around the filter.
It can generate substantial force and may work on very stubborn filters.
However, it can also crush or deform the filter body.
Band-style filter wrench
This type uses a metal band that grips the filter.
It is often easier to use than a chain wrench and can provide good leverage.
Socket-style filter wrench
Some filters have a specific fitting or require a special cup-style filter socket.
This is particularly useful when the filter is difficult to access.
A cup wrench that fits the filter correctly can apply force more evenly than an improvised tool.
Use the Correct Direction
It sounds obvious, but it is surprisingly easy to apply force in the wrong direction when working underneath a vehicle.
The basic rule is:
Turn counterclockwise to remove a conventional threaded spin-on filter.
However, always consider your viewing angle and the position of the filter.
If you are working underneath the vehicle, your physical orientation can make the direction feel reversed.
Before applying significant force, visualize the filter's threaded connection and confirm which direction loosens it.
Improve Your Grip Before Increasing Force
If the filter wrench slips, do not immediately increase the amount of force.
A slipping tool can damage the filter and make removal much more difficult.
Instead:
-
Clean excess oil from the filter
-
Position the wrench correctly
-
Make sure the tool is gripping the filter firmly
-
Use the correct size tool
-
Check whether surrounding components are interfering with the wrench
The goal is to transfer torque into the filter rather than simply crushing it.
Use a Longer Handle Carefully
If the filter is extremely tight, additional leverage may be necessary.
A longer ratchet or breaker bar can increase the torque applied to a suitable filter removal tool.
However, this should be done carefully.
More leverage does not just increase your ability to remove the filter. It also increases the possibility of:
-
Crushing the filter
-
Breaking the filter housing
-
Damaging the engine mounting surface
-
Damaging nearby components
-
Slipping and injuring yourself
If the filter begins deforming instead of turning, stop.
At that point, a different removal strategy is usually better.
What If the Filter Is Completely Stuck?
If the filter refuses to move with a normal filter wrench, there are several escalation options.
The safest approach is to move gradually from non-destructive methods toward more aggressive ones.
Do not immediately puncture the filter.
First try:
-
A better-fitting filter wrench
-
A different style of filter wrench
-
A cup-style tool if compatible
-
Better access to the filter
-
Additional controlled leverage
-
Professional removal if the filter is badly damaged
The Screwdriver Method: A Last Resort
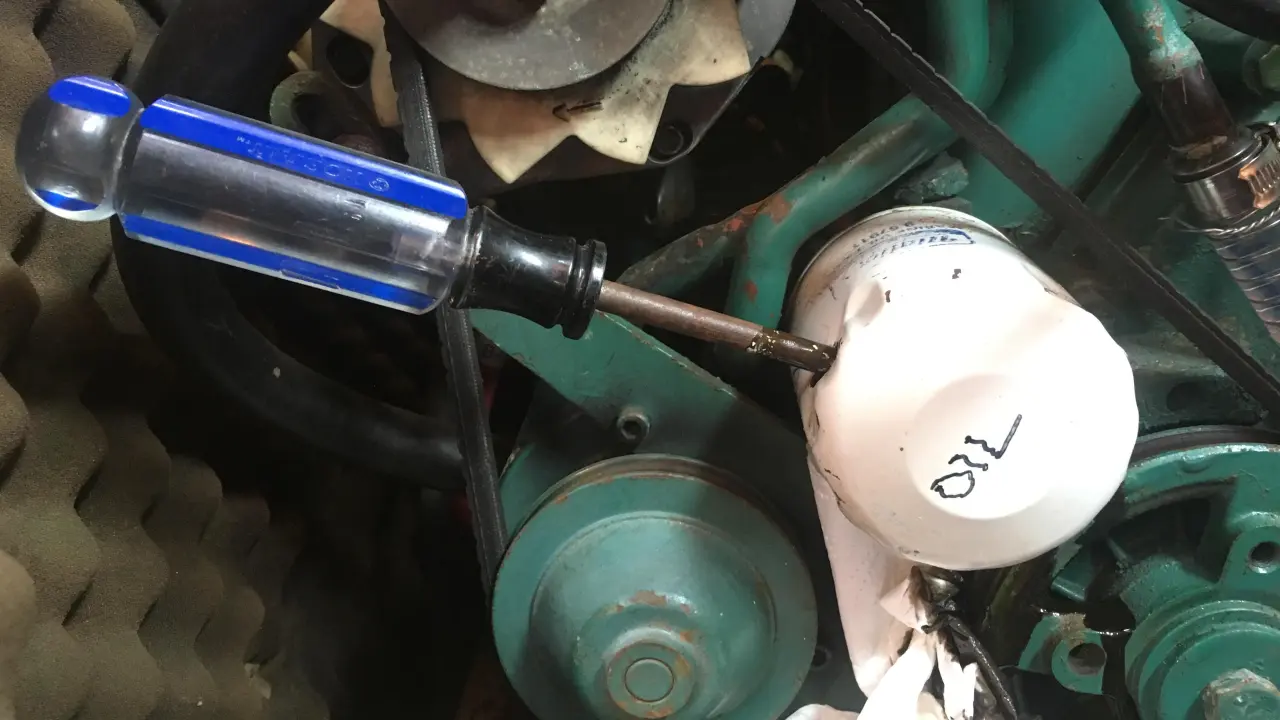
One traditional method involves driving a large screwdriver through the metal body of a spin-on oil filter and using the screwdriver as a lever.
This can work.
But it should be considered a last-resort technique, not a normal oil-filter removal method.
Once the filter is punctured, you have committed to removing it.
The filter may tear, the screwdriver may slip, or the filter body may deform without turning.
There is also a risk of damaging nearby components.
If the filter is mounted close to the engine block or other sensitive components, using a screwdriver can be particularly risky.
If you use a destructive method, make sure you have confirmed that:
-
The filter is definitely a disposable spin-on filter
-
You have a replacement filter ready
-
The filter is not part of a reusable housing
-
There is enough clearance around the filter
-
You can safely apply force without damaging the engine
Never use this technique on a cartridge filter housing.
Why You Should Not Hammer Randomly on the Filter
Hammering on the filter may seem like an easy way to loosen it.
In reality, uncontrolled impacts can damage the filter, surrounding components, or the engine's filter mounting area.
If impact is necessary, it should be controlled and applied through an appropriate tool designed for the job.
The objective is to loosen the threaded connection, not to destroy everything around it.
What If the Filter Starts Crushing?
Stop and reassess.
A crushed filter is much more difficult to remove than a filter with an intact cylindrical body.
If the filter is deforming under the filter wrench, switch to a tool that grips the filter more securely.
A cup-style filter wrench can be particularly useful when the filter has a compatible shape and access is available.
If the filter is already severely damaged, professional assistance may be preferable to continuing with increasingly aggressive tools.
What If the Filter Is Leaking?
If you discover an oil leak around the filter during removal, inspect the filter mounting area carefully.
A leak may be caused by:
-
A damaged gasket
-
An improperly installed filter
-
A loose filter
-
An incorrectly fitted gasket
-
A double gasket
-
A damaged filter housing or mounting surface
A leaking filter should not simply be tightened excessively.
Remove the filter, inspect the sealing surface, and install the correct filter according to the manufacturer's instructions.
Be Careful With the Oil Filter Housing
Some modern engines use a cartridge filter housing made from plastic or aluminum.
This component can be damaged surprisingly easily if the wrong tool is used.
If the housing cap has a specified socket size, use the correct socket.
Do not use an adjustable wrench or pliers on a plastic filter cap unless the manufacturer specifically provides for such a method.
If the cap is stuck, excessive force can crack it.
A damaged oil filter housing can lead to oil leakage and expensive repairs.
What Should You Do After Removing the Stuck Filter?
Once the filter has finally been removed, do not immediately install the new one.
First inspect the mounting area.
Check the old gasket
Make sure the old filter gasket has been removed.
Run a finger carefully around the sealing surface and visually confirm that no old rubber gasket remains attached.
A double gasket can cause a serious oil leak after the engine is started.
Clean the sealing surface
Use a clean cloth to remove old oil and contamination from the mounting surface.
Do not aggressively scratch the sealing surface.
Inspect for damage
Check the filter mounting area for:
-
Damaged threads
-
Scratches
-
Cracks
-
Deformed sealing surfaces
-
Pieces of old gasket
-
Signs of previous leaks
If the threaded mounting area or housing is damaged, it should be repaired before the new filter is installed.
How Should the New Oil Filter Be Installed?
Installation is just as important as removal.
For a conventional spin-on filter, lightly lubricate the rubber gasket with clean engine oil unless the manufacturer specifies otherwise.
Then carefully thread the filter onto the mounting surface by hand.
It should turn smoothly.
If the filter immediately feels cross-threaded or unusually difficult to turn, stop and inspect the threads.
Do not use a wrench to force a filter onto damaged or incorrectly aligned threads.
Once the filter is seated, tighten it according to the manufacturer's specified procedure.
Some filters are specified by hand-tightening plus a certain fraction of a turn. Others have specific torque requirements.
Do not assume that tighter is better.
Why Overtightening the New Filter Is a Bad Idea
Many people make the same mistake that caused the original problem.
They believe that tightening the filter as much as possible will prevent leaks.
It can actually make the next oil change much more difficult.
Overtightening can:
-
Flatten the gasket excessively
-
Make future removal difficult
-
Damage the filter
-
Damage the filter housing
-
Complicate future maintenance
The correct installation procedure should always take priority over applying maximum force.
Should You Use Anti-Seize on the Oil Filter Threads?
Generally, do not improvise with anti-seize or other compounds unless the manufacturer specifically recommends them.
The sealing gasket is the critical sealing component on a typical spin-on filter.
Adding unapproved substances to the filter threads can alter how the filter tightens and can create unintended problems.
Use the filter installation procedure specified for the vehicle and filter.
What Tools Are Worth Keeping for Oil Changes?
If you perform your own oil changes, a few inexpensive tools can make the job much easier.
Useful equipment includes:
-
Correct-size oil filter wrench
-
Cup-style filter sockets for compatible filters
-
Ratchet or breaker bar
-
Drain pan
-
Correct socket for the drain plug
-
New drain plug washer when required
-
Nitrile or mechanic's gloves
-
Clean shop towels
-
Correct replacement oil filter
-
Correct engine oil
-
Jack stands or a suitable vehicle lift
Having the correct filter wrench before starting an oil change can save a great deal of frustration.
When Should You Stop and Ask a Professional?
There is a point where additional force becomes more dangerous than helpful.
Professional assistance is advisable if:
-
The filter is badly crushed
-
The filter housing is beginning to crack
-
The mounting threads appear damaged
-
You cannot obtain a secure grip
-
The filter is located in a very restricted area
-
You are unsure whether it is a spin-on or cartridge system
-
You are working underneath a vehicle without safe support
-
You suspect the filter has been cross-threaded
-
The filter is stuck to a damaged housing
A professional technician has access to specialized filter removal tools and can often remove a severely stuck filter without damaging the engine.
The Most Important Lesson: Do Not Overtighten the Next Filter
If you have just spent an hour fighting a stuck oil filter, the best thing you can do is make sure the replacement filter does not create the same problem.
Follow the manufacturer's installation instructions.
Use the correct filter.
Lubricate the gasket when required.
Thread the filter carefully by hand.
Tighten it to the specified level.
This makes the next oil change considerably easier.
Final Thoughts
A stuck oil filter can turn a simple oil change into a frustrating repair job, but the solution is usually to increase control rather than simply increase force.
Start with hand removal, then use the correct oil filter wrench. If necessary, move to a more suitable tool such as a strap, band, chain, or cup-style wrench.
Avoid immediately resorting to destructive methods.
If a screwdriver or other puncturing technique becomes necessary, remember that it should only be considered for a disposable spin-on filter and only when you are confident that surrounding components will not be damaged.
Once the old filter is removed, inspect the sealing surface, make sure the old gasket is not stuck to the engine, and install the new filter according to the manufacturer's instructions.
Most importantly, do not overtighten the replacement filter.
A properly installed oil filter should seal securely while still being removable at the next service.