TR
TR EN
EN

How Is Headlight Cleaning Done?
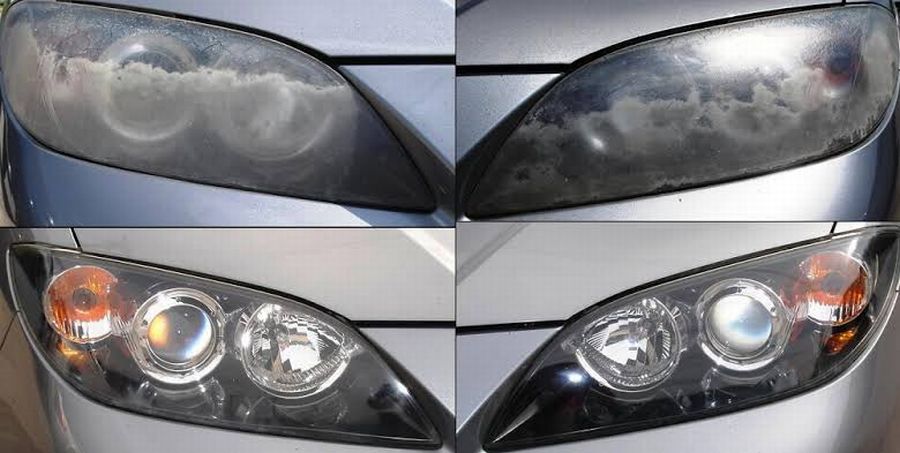
Headlights can become yellow, cloudy, scratched, or dull over time. This is particularly common with plastic headlight lenses. Sunlight, UV radiation, road dirt, dust, chemicals, and temperature changes can gradually reduce the transparency of the lens.
Cleaning headlights is not only about improving the vehicle's appearance. A cloudy headlight lens can scatter light and reduce the effectiveness of the lighting system, especially during nighttime driving.
Depending on the condition of the headlight, a simple cleaning may be enough. More heavily oxidized headlights may require sanding, polishing, and UV protection.
Why Do Headlights Turn Yellow and Cloudy?
Modern vehicle headlights are commonly made from plastic materials such as polycarbonate. The outer surface may also have a protective factory coating.
Over time, the surface can be exposed to:
-
Sunlight and UV radiation
-
Road salt
-
Dust and sand
-
Insect residue
-
Chemicals
-
Incorrect cleaning products
-
Automatic car-wash brushes
-
Small stones and road debris
These conditions can cause oxidation and microscopic scratches on the lens.
When a headlight begins to look yellow or cloudy from the outside, the problem is often on the outer plastic lens rather than the bulb itself.
Check the Headlight Condition Before Cleaning
Not every cloudy or yellow headlight needs to be sanded.
First, determine why the headlight looks cloudy.
If the surface is dirty
If the headlight only has road dirt, oil, insects, or a surface film, normal cleaning may be sufficient.
If the surface is slightly cloudy
A suitable headlight polish or mild polishing compound may improve the appearance.
If the headlight is heavily yellowed or oxidized
Sanding followed by polishing is usually required.
If the inside of the headlight is fogged
Cleaning the outside will not solve the problem. The vents, seals, housing, and possible water intrusion should be checked.
If the lens is deeply cracked
Polishing may not restore the headlight, and replacement may be necessary.
What Materials Are Needed for Headlight Cleaning?
Simple external cleaning does not require many materials.
Depending on the condition of the headlights, you may need:
-
Car shampoo
-
Clean water
-
Microfiber cloths
-
Masking tape
-
Headlight polishing compound
-
Polishing pad
-
Wet sandpaper
-
Spray bottle
-
Suitable surface cleaner
-
UV-resistant headlight protection
If sanding is necessary, several grades of wet sandpaper may be useful.
Depending on the severity of the damage, grades such as 800, 1000, 1500, 2000, and 3000 grit may be used. However, the same sanding sequence is not required for every headlight.
How Is Basic Headlight Cleaning Done?
If the headlight is only dirty, the process is relatively simple.
First, rinse the headlight thoroughly with water.
Then clean the surface with automotive shampoo to remove dirt and oil.
Do not aggressively rub a dry, dirty headlight with a cloth. Sand and other particles on the surface can create additional scratches.
After cleaning, dry the headlight with a clean microfiber cloth.
If the headlight still looks yellow or cloudy, the problem is probably oxidation of the outer surface, meaning that polishing or restoration may be required.
How Is Headlight Polishing Done?
Polishing can be used when the headlight has light cloudiness and fine surface scratches.
First, clean the headlight and the surrounding area thoroughly.
Then protect the paint and other nearby surfaces with masking tape.
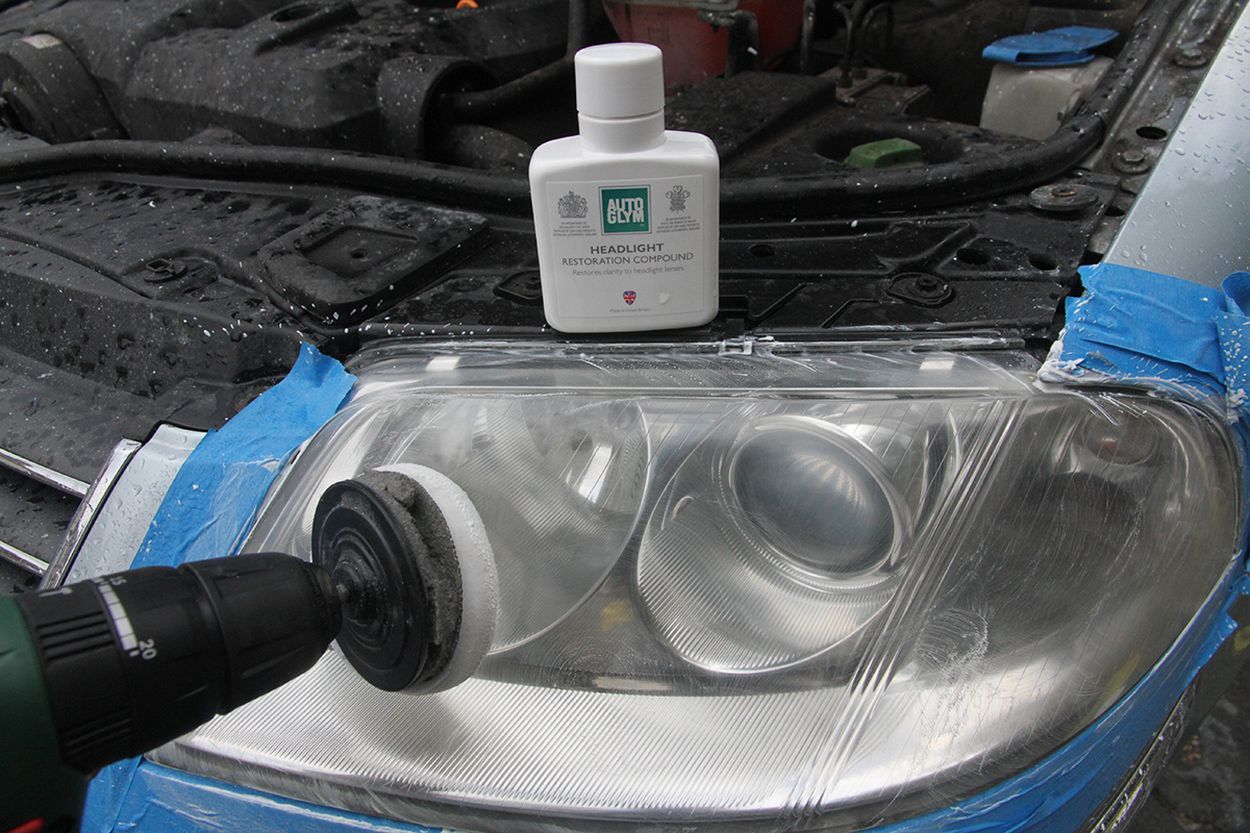
Apply an appropriate polishing compound using a suitable polishing pad.
If a machine polisher is used, do not operate at excessive speed or remain on one spot for too long.
Plastic headlight lenses can become hot during polishing. Excessive heat can damage or deform the surface.
For this reason, machine polishing should be performed carefully and with controlled pressure and speed.
After polishing, clean the lens and inspect the result.
How Do You Clean a Yellowed Headlight?
If a headlight is heavily yellowed and oxidized, polishing alone may not be enough.
A more comprehensive restoration usually involves:
Sanding + polishing + UV protection
First, clean the headlight thoroughly and mask the surrounding painted surfaces.
The damaged outer layer is then carefully removed using wet sanding.
How Is Headlight Sanding Done?
Wet sanding is generally preferred for plastic headlight lenses.
During sanding, both the lens and sandpaper should be kept wet.
The purpose is to gradually remove the oxidized, yellowed, and damaged outer layer.
Sanding should be performed evenly across the entire surface.
Do not apply excessive pressure to one area or remain in one spot for too long.
Depending on the condition of the lens, the process can begin with a coarser grit and gradually move to finer grits.
For example, heavily oxidized headlights may require a relatively coarse starting grit, followed by progressively finer grades.
The final sanding stage should leave a smooth and evenly prepared surface suitable for polishing.
Why Should Sandpaper Grit Be Progressively Finer?
Coarser sandpaper removes oxidation and deeper surface defects more quickly, but it leaves more noticeable sanding marks.
Finer sandpaper gradually removes these marks and produces a smoother surface.
For this reason, trying to remove heavy oxidation using only very fine sandpaper may be inefficient.
The important point is not simply increasing the grit number. Each sanding stage should properly remove the marks left by the previous stage.
What Is Done After Sanding the Headlight?
After sanding, the headlight will normally look completely dull or hazy.
This is normal.
Sanding creates very fine scratches across the plastic surface.
The next step is polishing.
A suitable headlight polishing compound and pad are used to remove the fine sanding marks and restore transparency.
However, the process should not end at polishing.
Why Is UV Protection Important After Headlight Restoration?
The original protective layer on the headlight surface may have been removed during sanding.
If the newly restored surface is left unprotected, UV radiation can quickly cause it to deteriorate again.
For this reason, applying a UV-resistant headlight coating or suitable protective product after restoration is important.
Skipping this step can result in the headlight becoming yellow and cloudy again relatively quickly.
Can Toothpaste Clean Headlights?
Using toothpaste to clean headlights is a popular DIY method.
The mild abrasive materials found in some toothpastes can remove certain surface contaminants and may improve very light cloudiness.
However, toothpaste is not a professional or long-term solution for heavily oxidized headlights.
If the lens has significant UV damage, oxidation, or scratches, toothpaste alone will usually not provide satisfactory results.
The surface can also become cloudy again if it is not properly protected afterward.
Do Headlight Cleaning Sprays Work?
The effectiveness of headlight cleaning products depends on the type of product and the condition of the lens.
Some products can be useful for removing dirt and mild oxidation.
However, serious oxidation requires physical removal of the damaged surface layer. A product marketed simply as a "headlight cleaner" may not be capable of restoring a severely yellowed lens.
The product should also be specifically suitable for plastic and polycarbonate surfaces.
Can Brake Cleaner Be Used to Clean Headlights?
It is generally not recommended to use brake cleaner, thinner, strong solvents, or aggressive chemicals randomly on headlight lenses.
Some solvents can affect plastic surfaces and cause cracking, hazing, or permanent damage.
Unless the compatibility of the chemical with the specific headlight material and coating is known, aggressive solvents should be avoided.
This is particularly important with newer headlights that may have specialized surface coatings.
Common Mistakes When Cleaning Headlights
Several mistakes can make the headlight surface worse.
Common mistakes include:
-
Sanding a dry or dirty headlight
-
Applying excessive pressure
-
Staying too long in one area
-
Using excessive polishing speed
-
Overheating the plastic
-
Failing to mask the surrounding paint
-
Using aggressive solvents
-
Using an inappropriate sanding sequence
-
Leaving the headlight unprotected after polishing
-
Ignoring UV protection after restoration
Excessive heat is especially important to avoid when working with plastic lenses.
Can Headlights Be Cleaned With a Machine?
Yes.
Professional headlight restoration often uses a machine polisher.
Machine polishing can be faster and more effective than hand polishing.
However, using a machine does not automatically produce a better result.
An unsuitable pad, incorrect polishing compound, excessive speed, or excessive pressure can overheat the plastic lens.
The surface should therefore be worked gradually and carefully.
Does External Headlight Cleaning Clean the Inside?
No.
External yellowing and internal contamination are different problems.
Sanding and polishing the outside of the lens will not remove:
-
Dust inside the housing
-
Moisture
-
Condensation
-
Internal dirt
-
Damage to the inner surface
If there is an internal problem, the headlight's seals and ventilation system should be inspected.
If the headlight needs to be removed, the procedure should be performed carefully to avoid damaging the housing, wiring, or mounting points.
What Should You Do If There Is Condensation Inside the Headlight?
Light and temporary condensation can occur under certain conditions and may not necessarily indicate a serious problem.
However, persistent moisture, large water droplets, or visible water accumulation inside the headlight are not normal.
The following should be inspected:
-
Headlight seals
-
Ventilation passages
-
Headlight housing
-
Lens-to-housing seal
-
Cracks
-
Rear covers
The source of the moisture should be corrected before restoring the outside of the lens.
How Long Does Headlight Restoration Last?
The durability depends on the restoration method and the quality of the final protection.
If a headlight is simply polished and left unprotected, the surface may become cloudy again relatively quickly.
A suitable UV-resistant coating or protective treatment can significantly extend the life of the restoration.
The amount of sunlight the vehicle receives, environmental conditions, cleaning methods, and the quality of the protective product can all affect how long the result lasts.
Does Headlight Cleaning Improve Lighting Performance?
Yes, when external cloudiness or oxidation is responsible for part of the light loss, restoration can noticeably improve lighting performance.
A cloudy lens can scatter light and prevent it from passing through the lens correctly.
Restoring the transparency of the lens can improve light transmission and distribution.
However, headlight performance does not depend solely on lens condition.
The following components may also need to be checked:
-
Bulb or LED module
-
Reflector
-
Projector lens
-
Headlight adjustment
-
Electrical voltage
-
Internal headlight components
Can Every Yellowed Headlight Be Restored?
No.
If the lens is severely degraded, cracked, or internally damaged, cleaning may not be sufficient.
Deep cracks, severe deformation, or extensive material damage may make headlight replacement the better solution.
Modern headlights may also contain LED modules, projectors, electronic control units, and adaptive lighting mechanisms. In such cases, cleaning the external lens alone will not resolve every possible headlight problem.
Can Headlight Protection Film Be Used After Restoration?
Suitable transparent protective films can be used to protect the restored surface.
However, the film should be compatible with the headlight lens and should not significantly reduce light transmission.
The headlight surface must also be properly prepared before applying the film.
Depending on local regulations, there may also be requirements concerning films or coatings applied to vehicle lighting components. Any product used should therefore be appropriate for road use.
When Should Headlights Be Cleaned?
Headlights should be inspected when they begin to become noticeably yellow, cloudy, or dull.
If nighttime visibility seems weaker than before, the condition of the headlight lenses should be checked instead of automatically assuming that the bulbs need to be replaced.
Early restoration can also be easier because the surface may not yet have severe oxidation or deep damage.
Final Thoughts
Headlight cleaning can range from simple washing to a complete headlight restoration process involving sanding, polishing, and UV protection.
For a dirty headlight, proper washing and a microfiber cloth may be enough. For light cloudiness, polishing can improve the surface. For heavily yellowed and oxidized headlights, controlled wet sanding, polishing, and UV protection are generally more appropriate.
One of the most important steps is protecting the lens after restoration. If the original protective layer has been removed during sanding and polishing, leaving the surface unprotected can allow UV radiation to damage it again relatively quickly.
When performed correctly, headlight restoration can improve the appearance of the vehicle and help restore lighting performance that has been reduced by external oxidation and surface cloudiness.